Cisco ATA 186/188
| Quick links: |
|---|
This hard phone is actually an ATA (analog telephone adaptor). It enables you to connect your POTS (plain old telephone system) phones to the Internet. Think of it as a phone jack for VoIP. It has one ethernet port and two RJ11 phone jacks. It is fairly easy to configure. Out of the box, it is configured for DHCP. This means that it gets its IP address from your DHCP server automatically. Full documentation can be found at Cisco's Site.
Since Intpho.net works only with SIP protocol, you need to make sure that you are running the correct SIP firmware on your phone. The latest version is 3.0 and can be found here.
STEP 1 You may first want to reset your unit to factory default setting. To do this, pick up the phone handset attached to the Line 1 jack and press the illuminated red button. Dial: 322873738# then dial * and hang up. NOTE: this will completely reset the unit to factory default settings, erasing any values that may already exist! |
STEP 2 Now, again pick up the phone handset and press the red button, then Dial: 21 # and you will be told the IP address of your device (e.g. 192.168.0.100). |
STEP 3 Go to any browser equipped computer on your network and enter the address: http://<IP ADDRESS>/dev |
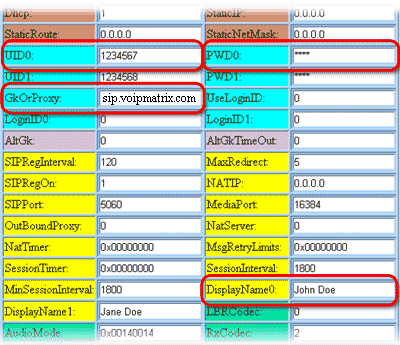
STEP 4 You need to modify only a few parameters from the factory default. They are listed here: |
 |
|
UID0 |
Enter the phone number you chose when you signed up for our service. | |
| PWD0 | Enter the password that you chose when you signed up for our service. | |
| GkOrProxy | sip.voipmatrix.com | |
| DisplayName0 | Enter your full name. This will show up as part of your callerid. | |
STEP 5 Click on the "apply" button on the bottom of the form. |
STEP 6 Make calls! |