| Quick links: |
|---|
Linksys SPA9000 PBX
The Linksys SPA9000 marries the rich feature set of legacy PBX telephone systems with the convenience and cost advantages of internet telephony. It has common key system features such as an auto attendant, shared line appearances, three way call conferencing, music on hold, "follow me" calling, and many more. The SPA9000 opens up access to the benefits of Voice Over IP, including low cost long distance service, phone number portability, and one network for both voice and data. Here we are showing a basic configuration guide for it to work with the Linksys SPA 941 IP phone.
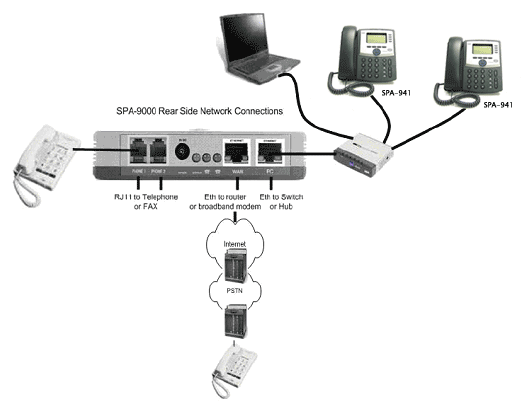
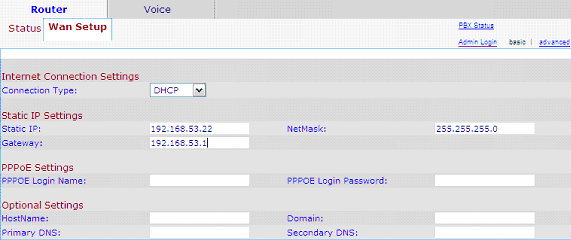
STEP 1: Connecting to the Internet Connect the ethernet cable from your PC to the ethernet port of the SPA 9000. Then connect your cable or DSL modem's ethernet cable to the router's Internet port. Now, power up your PC, cable and DSL modem and your router. Open you web browser and enter 192.168.0.1/admin/advanced . Click on the ROUTER tab and then the WAN Setup tab. The possible Internet connection types are:
Consult with your ISP, if you are unsure.
|
STEP 2: Change your DIAL PLAN Under the same SIP tab, look for the PBX Phone Parameters section and copy and paste the following Dial Plan (9,[3469]11S0|9,[2-9]xxxxxx|9,<:1>[2-9]xxxxxxxxxS0|9,1[2-9]xxxxxxxxxS0|9,011xx.|9,xx.|[1-8]xx|9,vmxx.) to the “Phone Dial Plan” as shown in the circled area in the graphics below.
|
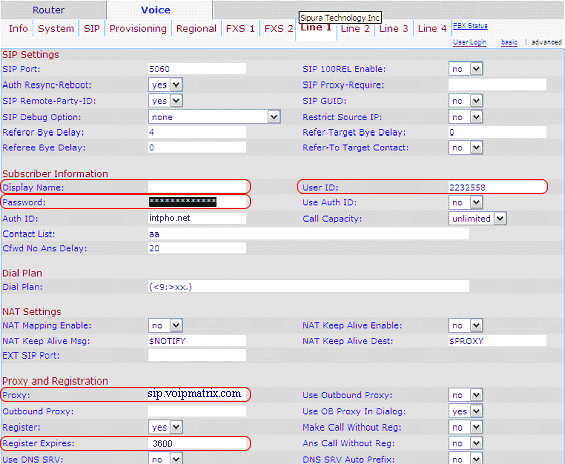
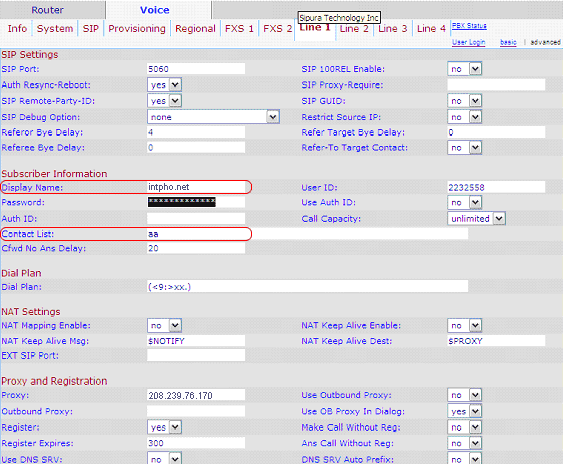
STEP 3: LINE configuration The SPA 9000 has 4 VoIP lines which you can configure according to your needs. Using Line 1 as an example to configure your Intpho.net VoIP line and line answer pattern. 3.1 Configure Intpho.net VoIP line.
|
|
3.2 Configure Line Answer pattern.
Auto Attendant In this case, calls will be answered by the Auto Attendant.
Call Hunting In this case, a call will ring extensions 100, 101, and 102 sequentially. If the call is not answered then it will be sent to the Auto Attendant.
Direct Call A call will ring directly to extension 100.
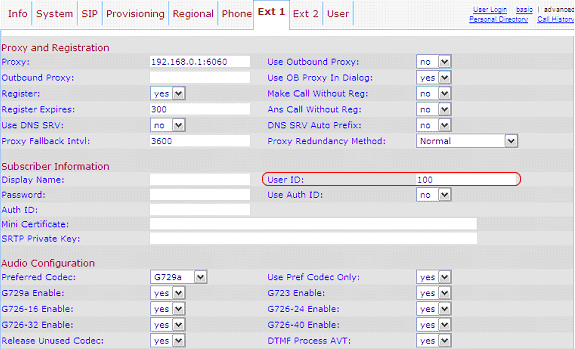
Interoperability - SPA 941 IP Phone Configuration guide to work with SPA 9000 Linksys SPA 941 IP Phone is designed to inter-operate with SPA 9000. When a SPA 941 connects into the same Local Area Network that a SPA 9000 resides, it will sync-up with it. You do not need to configure either device for them to identify each other. SPA 941 ships with 2 extensions and can be upgraded to 4. Step 1 After power-up, obtain the IP address of the SPA 941 by pressing the MENU button on the phone Step 2 Enter the IP address of the SPA 941 in your browser, click on the Admin and then, the Advanced link. Step 3 If this is the 1st SPA 941 connected to the LAN that the SPA 9000 is connected, User ID of 100 is automatically assigned by the SPA 9000 to this phone's EXT 1. You can see this in the USER ID field of EXT 1. No password is needed or assigned. If you connect a 2nd SPA 941 to the network, EXT 1 of the 2nd SPA 941 will show 101 and so on.
|
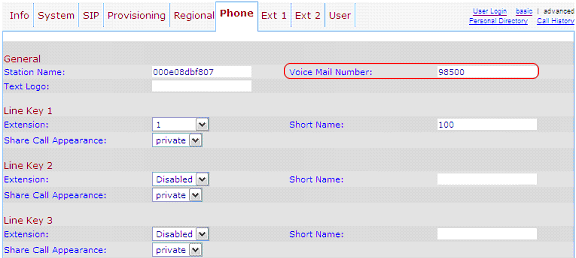
STEP 4: To allow voicemail access Click on the Phone tab. Enter 98500 in the Voicemail Field. This will program the Voicemail button on the phone.
|
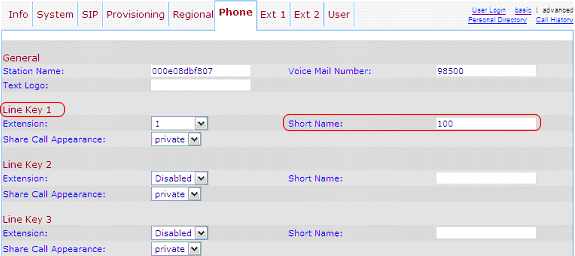
STEP 5: Line key setting for each of the line button on the IP Phone Line Key 1 to 4. Select the extension number and enter a number or a short name. In this example, we use 100. This will show on the phone's LCD screen next to the respective button.
|
STEP 6: To set your voicemail credentials, click on the USER tab This feature allows you to greet caller with your own greetings when you are unable to answer a call in your extension. You will need to designate your Intpho.net Virtual Number (VN) for each extension for voicemail. This VN “CANNOT” be the same as the Intpho.net VNs used in LINES 1 to 4, in the SPA 9000. Enter your Intpho.net VN in the following format 9,vm + VN (9,vm1252566) Note: for 1252566 – use your own VN instead.
|
STEP 7 To make outside calls, dial 9 and then the telephone number. To dial another person's phone in the office, dial that person's phone extension number such as 100. |
Diagram of Phone and Network Connection
