| Quick links: |
|---|
|
Sipura SPA-3000
The SPA-3000 features VoIP adapter functionality found in the SPA-3000 with the additional benefit of an integral connection for legacy telephone network “hop-on, hop-off” applications. SPA-3000 users will be able to leverage their broadband phone service connections more than ever by automatically routing local calls from cell phones and land lines to a VoIP service provider and vice versa.
A typical user calling from a land line or mobile phone will be able to reduce and even eliminate international and long distance telephone charges by first calling their SPA-3000 via a local phone number or by using a telephone connected directly to the unit. The advanced authentication and call routing intelligence programmed into the SPA-3000 will connect the caller via the Internet to the far end destination with security and ease. Using the SPA-3000 at the far end, calls can be answered immediately or further processed as a local call to any legacy land line or mobile phone allowed by the SPA-3000 dial plan.
If power is lost to the unit or the VoIP service is down, calls can be sent to a traditional carrier via the FXO interface.
NOTE: We have seen instances where installing the SPA-3000 behind a firewall which blocks ICMP packets causes problems with registration. Try turning off any ICMP blocking on your firewall.
STEP 1 You must first determine what IP address it received. To do this, you need to pick up the phone attached to the Line 1 jack and dial: then dial: 110 # and you will be told the IP address of your device (e.g. 192.168.0.100) |
STEP 2 Go to any browser equipped computer on your network and enter the address: http://<IP ADDRESS>/ |
STEP 3 Click on the "Admin Login" button near the top right side of the screen, then click on the "Line 1" tab. |
 |
STEP 4 You need to modify only a few parameters from the factory default. They are listed here: |
|
| Proxy: | sip.voipmatrix.com |
| Display Name: | Enter your full name, this will show up as part of your callerid. |
| User ID: | Enter the phone number you chose when you signed up for Intpho.net service. |
| Password: |
Enter the password that you chose when you signed up for Intpho.net service. |
| Register Expires: | 3600 |
 |
|
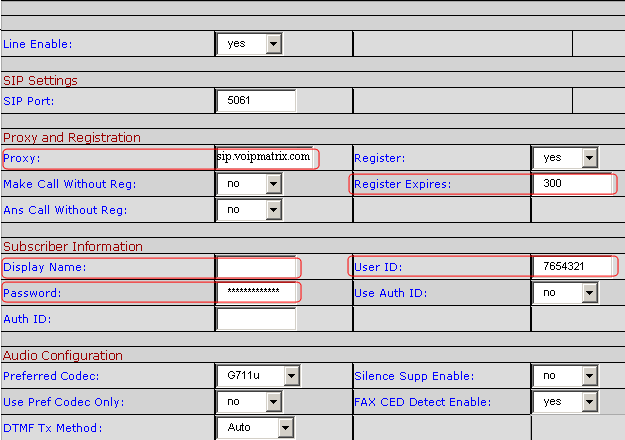
STEP 5 Click on “PSTN Line” Tab. Note: In order to use the PSTN option,
you must set up a new Virtual Number in your control panel. |
|
Modify only the circled items of the following:
|
|
Proxy: |
sip.voipmatrix.com |
| Register Expires: | 300 |
| Display Name: | Enter your full name. |
| Userid: | Enter the phone number you chose when you signed up for Intpho.net service. |
| Password: | Enter the password that you chose when you signed up for Intpho.net service. |
 |
|
STEP 6 Change the “Preferred Codec” to G729a. Also change the “Use Pref Codec Only” to Yes. You can do this for both Line 1 and PSTN (i.e. if you are going to use PSTN).
|
STEP 7 Click on the "Submit All Changes" button at the bottom of the form. |
STEP 8 Make calls! |
